|
|
This is mostly a text page with just a few diagrams, I highly recommend you use a chess set.
(Click HERE to see a detailed explanation of the symbols I use when annotating a game. REPLAY this game.)
**************************************************
An absolute smoker. An extremely
rare game ...
from the last round of
the Russian Championships.
An incredible contest that is nearly a
true modern miniature.
(This is very
rare at this level, especially considering
the ratings of the players
involved, and
the fact that BOTH players are GM's!!)
This game is also already famous. It
has been mentioned by dozens of
chess news
services and chess
servers. (Like GM Khalifman's on-line
chess news-letter,
ChessBase, and
the London Chess Center's, "Chess
Express.")
I have probably received somewhere
between 35-to-50 emails, all asking
basically
the same question:
"Where did White lose this game?"
(The ratings are exact - those of FIDE.)
--->
I have offered a (slightly shortened) version of
this game to FL CHESS
for possible publication.
**************************************************
1.e4 e6;
{Diagram?}
Dolmatov is one of the world's
leading experts in the French.
2.d4 d5;
3.e5!?, {Diagram?}
The Advance Variation, championed
by A. Nimzovich.
But this game won't
do much to promote this line!
One of the biggest Hyper-Modern
contributions to chess theory, and
especially those
of Nimzovich ... were
the understanding of certain positions
and the correct way to play
them. (His
insights into the structure of positions
with long pawn chains, the ideas of
prophylaxis and square control, and
also the correct strategies in these
types of
positions - were really new
and certainly revelations to the
average player!)
[ The move: 3.Nd2;
{Diagram?}
leads to the Tarrasch System
against the French. ]
In the Advance System, it is important
to play the break ...c5; and then focus
on d4.
(The new base of the pawn
chain.) Naturally Dolmatov does this
without delay.
3...c5; 4.c3 Nc6;
5.Nf3 Qb6!?; {Diagram?}
This is probably the most aggressive
move and also the most thematic.
[ Lately theory has smiled on
5...Bd7!?; {Diagram?}
as the main try for the second
player from this position. ]
6.a3!?,
(Maybe - '!') {Diagram?}
Believe it or not, theory long has
said this is the best line for White.
(Many opening books give this
move an exclam!)
[ I prefer the move 6.Be2!?,
{Diagram?}
developing a piece, over pushing
a pawn.
[ See MCO-14; page # 200, column # 1, & notes # (a - f.). ] ]
6...Nh6!?;
{Diagram?}
First of all this is NOT a new move!
{As one on-line 'newspaper' has
actually suggested!!}
(French Defense players have been
using the idea of ...Nh6-to-f5;
a lot
in the last 5-10 years.)
I checked the CB on-line database,
and it found 628 games with this
position!!
(I found it in one or two games earlier,
but it was really the Russians who
pioneered
this move in the 1970's.)
See the game: Eduard Zelkind -
Evgeny Mochalov;
43 BLR Ch, Minsk, U.S.S.R; 1978.
I like ...Nh6; and was even tempted to give it an exclam.
(One of my books
brands it as inferior.)
But the move 6...c4!; is best here according to the
many books I have,
especially one
brand-new book on the French.
[ According to many books,
Black should play (instead):
>/=
6...c4!;
{Diagram?}
I guess the main idea here is to
close the center and try to expose
the weakness of White's b3-square.
7.Nbd2 Na5;
8.Be2 Bd7; 9.0-0 0-0-0!?; {Diagram?}
This looks potentially risky.
***
( Black could try something like: 9...Ne7!?;
10.Rb1 Nf5; {Diagram?}
This looks like the best try for
Black, g4 for White looks too
loosening to me.
(Or 10...h6!?; 11.Re1, "+/=" {Diagram?}
with a very small advantage
for White in this position.
[ See the book,
"Nunn's Chess Openings," (NCO);
page # 262,
and line/row # 3. ]
There are 74 games in the (CB)
on-line database with this position,
but the authors do not give a game
reference in this particular line.)
11.h3 Be7; "~" {Diagram?} with a very playable game.
Analysis line, (I could find no games
with this position in the database).
- LM A.J. Goldsby I. )
***
(Returning to the main line {of analysis} here.)
10.Rb1 Qc7!;
11.Re1 Bc6; 12.Nf1 h6; {Diagram?}
The end of the column.
13.Ng3 Qd7;
14.Nh5 Ba4; 15.Qd2 g6; 16.Nf6 Qc7;
"=" {Diagram?}
MCO, (and GM Nick de Firmian);
rates this position as being fairly
balanced, I think Black might even
be a shade better. {A.J.G.}
"Unusual maneuvering by both
sides is called for by both sides in
this closed
position." - GM Nick de Firmian (& W. Korn)
K. Dabrowska - Z. Peng; (FIDE) Women's Interzonal
Tournament
Jakarta, Indonesia,
1993.
[ See MCO-14; page # 200, column # 2, and also note # (k.). ] ]
(Returning now to the actual game.)
7.b4!, "+/="
{Diagram?}
Again book ... and also supposedly
the best move for White.
(The Pawn
on b2 is no longer a target.)
The other nice thing about this move
is that Black is forced to clarify
the
pawn structure.
[ Not </= 7.Bxh6?
Qxb2!;
"=/+" {Diagram?}
and Black is already better. ]
Black continues to target d4.
7...cxd4!?; 8.cxd4, {Diagram?}
The most straight-forward, although
the move Bxh6 now also comes
under serious consideration.
[ Or 8.Bxh6!? gxh6;
9.cxd4, "+/=" {Diagram?}
and White is already a little
better here. ]
8...Nf5;
9.Bb2! Be7!?; 10.h4!?, {Diagram?}
I guess the idea here is to prevent
Black from playing ...Nh4; but the
whole concept
looks a little bit dubious to me. (Where will White's
King go? Will it spend the whole
game in the center?)
The book move here is Bd3!, "+/=" ... trying to tempt Black into taking
on d4.
(Bd3, 0-0; 0-0!,
etc.)
[ Better was: 10.Qd2!?;
or even >/= 10.Bd3!,
"+/=" {Diagram?}
with a slight edge for White.
]
Black's next move is positionally forced.
(Without levers, White's big edge in
space cannot be effectively challenged.)
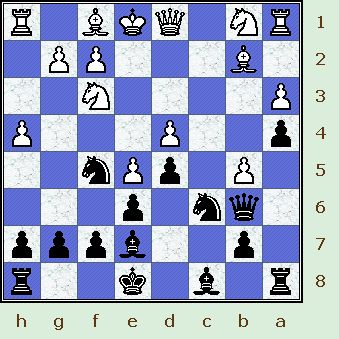
10...a5; 11.b5 a4!?; ('!')
{See the diagram just below.}
I like this ... Black is fighting for the
initiative and trying to keep White
a little off-balance.
***************
|
|
***************
This is the position at hand ...
White now takes radical steps to try and force Black back.
[ After the moves: 11...Na7;
12.Nc3, "+/=" {Diagram?}
Black may soon wind up feeling
very cramped as White tries
to
run him out of space. ]
12.g4!,
{Diagram?}
The most aggressive, and if it
was followed up properly, this
should have led
to a fairly large
advantage for White.
[ I guess the move: 12.h5!?;
{Diagram?}
was possible for White.
Of course not: 12.bxc6? Qxb2;
"/+" {Diagram?}
and Black is close to winning. ]
12...Nh6;
{Diagram?}
The only square that did not
lose a piece.
13.Rg1!?,
{Diagram?}
This is OK - I guess. But Bc1! was
much sharper and probably would
have resulted
in a position where the
first player holds a fairly sizeable edge.
[ It seems it would have been
much better for White to play:
>/=
13.Bc1! Na5!?; 14.Bxh6 gxh6!?; 15.Qxa4, "+/="
(Maybe "+/") {Diagram?}
and White is a solid pawn up.
(Black's 'comp' looks to be a
little weak in this position.) ]
Black's next is nearly forced, if
he goes passive now he will be
pushed right off the board.
13...Na5; 14.Nc3?!, (Maybe - '?')
{Diagram?}
This is both cowardly and bad, the
simple capture on a4 looks to be
at least a little better for White.
(White may have felt the capture
of
the pawn was overly risky.)
This is the turning point of the game,
but I am not even sure if both players
were completely aware of it.
[ It seems that after the moves: >/=
14.Qxa4 Bd7; 15.Bc1 Ng8;
16.g5,
"+/=" {Diagram?}
White could have
maintained a small advantage. ]
Now the Black Knight invades on
the b3-square with great effect.
14...Nb3; 15.Ra2!?, {Diagram?}
This looks to be very un-natural.
('?!') I never figured out a refutation
for the simple "Rook-to-b1."
The problem is that White faced a
very difficult decision at this point.
There are no easy answers, and the
position will not resolve itself for
many, many
more moves. In such
a complex position, it is common for
any class of player to
make an error
in judgment.
[ Better was Rb1, but after:
>/= 15.Rb1
Qa5; {Diagram?}
Black still has a solid edge. ]
15...Qa5!;
{Diagram?}
This alert pin saves Blacks QRP.
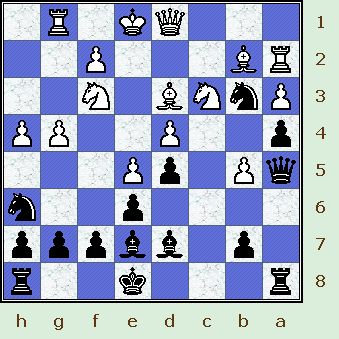
16.Bd3 Bd7;
(evaluation-time)
{See the diagram just below.}
White's position now looks to be
over-extended, but now he really
falls apart.
***************
|
|
***************
In such positions, an extremely tough
mental outlook is needed. You must
confess (to yourself) that your plan
has turned out poorly and failed, and
then be
willing to "batten down the
hatches" and ride out the storm.
(A young Korchnoi was very good
at this particular approach.)
17.Nd2?, (desperation)
{Diagram?}
White wishes to evict the Knight
at all costs, but the loss of the
Pawn in the center
of the board
has very serious repercussions.
(Was White trying to set a trap?)
The move 17.Kf1, avoided any
immediate disaster.
(Even playing
the move g5, was better than this
turkey.)
[ Much better for White was the
continuation:
>/= 17.Kf1 Rc8;
18.Qe1 0-0; "=/+" {Diagram?}
when White's game is still very
disorganized, but at
least no
forced win is immediately
evident for Black. ]
17...Nxd4;
18.Nxd5 Bxb5!?; {Diagram?}
Flashy ... and completely UN-necessary! The simple capture of
the Knight
on d5 leads to a clear
advantage for Black. (Maybe - '?!')
[ Much better was: >/= 18...exd5;
19.Bxd4 Bxb5; "/+" {Diagram?}
when Black is clearly for choice.
(Black is a clear pawn up and
White's pawn structure is full of
holes -
his pieces do not work
well together.) ]
19.Bc3?,
(Horrible!) {Diagram?}
This is VERY plausible ... but it is
also VERY, very, very wrong!!!
[ After the continuation: >/=
19.Nxe7[], 19...Bxd3!; 20.Bxd4 Rd8;
21.Qa1
Kxe7; "+/=" {Diagram?}
Black is at least a little better.
(Maybe - '/+' Black is a Pawn
ahead, but the position is very
un-balanced.) ]
Now White must have missed that
his Knight that winds up on the e7
square, will not be able to escape.
(Thus there is no rush to capture it.)
19...Qd8; {Diagram?}
Simple, practically forced, and
also quite good for Dolmatov.
[ Not </=
19...Qa7??;
20.Bxd4!, "+/-" {Diagram?}
and it is White who will win. ]
20.Nxe7 Bxd3!;
{Diagram?}
A nice "in-between" move.
[ White must have only seen a continuation something like:
</= 20...Qxe7!?;
21.Ne4, "~" {Diagram?} and the first
player does not appear
to be too badly off in this position. ]
21.Bb4!?,
{Diagram?}
White may as well try something
tricky here - practically everything
is
completely losing for him.
[ No good for White was: </=
21.g5!? Nhf5; 22.Nxf5 Nxf5;
23.Qg4!? Rc8;
24.Qxa4+!? b5; 25.Qb4 Qc7!; ("-/+") {Diag?}
and White loses a piece. (or more)
(25...Qc7!; 26.Bb2? Qc1+!!; 27.Bxc1 Rxc1#) ]
Now comes a VERY surprising
tactical sequence.
(And a very
rare two zwischenzugs in a row!)
The really odd thing is I don't think
any human even seriously considers
the move,
'Knight-to-the-g8-square,' yet most boxes and programs spot
this move fairly quickly.
21...Ng8!!; 22.Nxg8!?, {Diagram?}
It is difficult to suggest any real
or meaningful improvements for
White at this point in
the game. (Did he expect ...Rxg8; when the
move Rg3!, "+/=" gives him something
to play for?)
[ After the plausible moves:
22.Nf3!? Be2!;
23.Qxd4 Bxf3; 24.Rd2 Qxd4;
25.Rxd4 Nxe7;
("-/+") {Diagram?}
White has reached a position
where the Queens are off the
board ... and he is a whole
piece down. ]
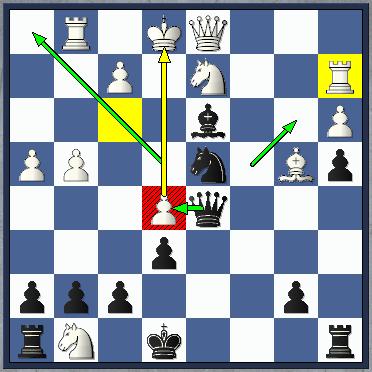
22...Qd5!!;
{See
the diagram just below.}
(Hits
a2, f3, e5, etc.)
(With simply too many threats!
Qa1 or Nf1 now looks forced
for White.)
***************
|
|
***************
Now while White is probably lost,
(no matter what move he plays);
but nonetheless,
his next move is
an error. (If you are not going to
resign, you have an obligation to
play the move which offers the
greatest amount of resistance.)
23.Rg3? Qh1+!; {Diagram?}
White ... RESIGNS!!
(White will come out down a lot
of material from this position.
Nf1 looks forced, when ..Qxf1+;
followed by ...Qxf2+ wins a whole
box of pieces.)
A brilliant expose of tactics by GM Sergey Dolmatov.
***
Copyright (c) A.J. Goldsby I. Copyright (c) A.J.G; 2003, and
2004.
Copyright (©) A.J. Goldsby, 2004. All rights
reserved.
***
(ALL pages ... HTML code initially) Generated with ChessBase 8.0
The first two diagrams were Generated with the program, Chess Captor 2.25.
Click HERE to return (or go) to my "Chess Express" page for this game.
***
There is no site map, but you can click here.
Click here
to go to - or return to - my page of:
ANNOTATED GAMES, (Angel-Fire 2) Page #3.
Click here to go to my (main) "Recent GM Games" page.
***
Click here
to go to, (or return to); my
"Best Games Page" on my Geo-cities
web site.
(Or use the "back" button on your web browser.)
(To contact me concerning this analysis, click here.)
***
Page (first) posted: September, 2003. Last up-date: Saturday; April 03rd, 2004.
Copyright
(c) A.J. Goldsby I;
Copyright (©) A.J. Goldsby, 2003 & 2004.
Copyright (©) A.J. Goldsby, 2005. All rights reserved.