H.N.
Pillsbury (2689) - Em. Lasker (2767)
[D40]
Super-Master Tournament
Cambridge Springs, PA; {USA}
(Rd. # 6), 03.05.1904
[A.J. Goldsby I]
***************************************************************************
A beautiful game by Pillsbury, many consider it his best and/or greatest game. (It was also played in the twilight of his career, Pillsbury died just two years later in 1906.)
It IS an exceptional and very beautiful
game of chess ... it is also the last time
Lasker and PIllsbury played. And in a
modern tournament, this game would
have easily carried off a
"best game"
prize.
*******
Here is also one of the most famous
of all stories in all the realm of chess.
You see, Pillsbury had lost to Lasker
in St. Petersburg, 1895/96 in this line. (A fantastic encounter that is
considered by some to be Lasker's
finest and also his most brilliant
game.)
Despite the fact that Pillsbury had
literally DOZENS of opportunities to
play a possible improvement - which
he had burned untold hours of ... 'midnight oil' on - he saved the big
surprise for his next encounter with
Lasker. (And Lasker alone!) No one
else was deemed worthy of Pillsbury's
great idea. And though he played
the great Lasker many times, it seemed
he would never get the opportunity to
use his new idea. (Either the color was
wrong, or Lasker played another line.)
But finally ... in their very LAST game
together ... Pillsbury got to spring the
trap!! (All of Pillsbury's hard work
paid off - Lasker was rarely beaten
in such a one-sided contest.) --->
( Read
... about the great debate! [more]
)
*******
This is also a very famous game ... it seems virtually every annotator
who ever lived (since) has tried his
hand at this epic struggle.
(Two
brand-new books that I just purchased contain this grand
contest!!)
***
The ratings come from the website of Jeff Sonas.
The game starts off as a fairly normal Queen's Gambit Declined.
***************************************************************************
1.d4 d5;
2.c4 e6; 3.Nc3 Nf6; 4.Nf3!?,
While not the main line, which is
Bg5; Pillsbury also liked to play
this on occasion.
(The database
clearly shows that Pillsbury used
this line on a regular basis, at
least 10-15 different times.)
[ Of course the move:
4.Bg5,
leads to the Pillsbury Attack, the
line which he practically patented.
(Pillsbury may not have played this
line because Lasker may have found
a fairly effective antidote the very
first time he faced this system OTB.) ]
4...c5!?;
(Possibly - '!') {Diagram?}
Many give this an exclam here ... "an example of Lasker's very energetic opening(s)," says one
author. But it is not really clear
which line is best at this point.
[ By playing the continuation: 4...c6;
5.e3 Nbd7; 6.Bd3 dxc4; 7.Bxc4,
"+/=" {D?}
a modern line - known as the
Meran System - is reached. (This line gives a solid
edge for White. But it is an
extremely popular system for Black.)
***
The simple developing move of
4...Be7; preparing a quick
...0-0;
was also very playable for Black. (This line probably yields
close
to
full equality for the second player from this position.)
]
5.Bg5!?,
(Maybe - '!')
Many authors give this move
an exclam ... but is it really the
best move here?
Once again, theory has vacillated many times over what the correct continuation is at this particular junction.
For my part, I like this move. White develops normally, and puts a lot of pressure on Black's slightly exposed central pawn set-up.
"In the fashionable variation, 5.BPxP, 5...KntxP! etc., White obtains very little advantage." - Fred Reinfeld.
*************************
[ According to modern
theory, a better
line for White would be:
>/= 5.cxd5! Nxd5;
{Diagram?}
I think this is the move that most
books recommend here for Black.
(After the moves: </= 5...exd5!?; 6.g3 Nc6; 7.Bg2 Be7;
8.0-0, "+/=" {D?}
White has obtained the formation
known as: "The Rubinstein Set-up,"
and has a very solid edge.)
6.e4!,
{Diagram?}
To me, this appears to be the most
energetic line White can adopt here.
*******
( Instead of the sharp e4, White
can play the simple (but effective)
move of
just advancing the KP
only one square, for example:
6.e3!? Nc6; 7.Bd3 cxd4; 8.exd4 Be7;
9.0-0 0-0; 10.Re1!?, {Diagram?}
Many theoretical manuals give
this move an exclamation mark.
( I also like the move a3 here: 10.a3!? Bf6!?; 11.Qc2! h6; 12.Rd1! Qb6!;
13.Bc4! Rd8; 14.Ne2! Bd7; 15.Qe4!, "/\" ("+/=")
{Diagram?}
White had a very powerful
initiative, that later developed
into a strong
K-side attack ... that won for White.
GM V. Smyslov - GM Z. Ribli; Candidates Match (sf) (G #5)
London, ENG; 1983.
{A fantastic game ... that could
be one of the most brilliant ever
played. It is certainly one of
Smyslov's very best games.} )
(Returning to the 6.e3!? line.)
10...Bf6;
11.Be4 Nce7!?; 12.Qd3 h6; 13.Ne5!?,
White grabs the out-post.
( Interesting is: 13.a3!?, "+/=" )
13...Nxc3; 14.Qxc3 Nf5; 15.Be3 a5!?;
16.Rac1 a4!?;
The end of the column.
17.Red1 Nxe3!?; {Diagram?}
It makes sense to me for Black
to pick off one of the White B's.
( Karpov suggests: 17...Ra5!?; 18.Nc4 Rb5!?; "<=>" {Diag?}
and calls this unclear. "~" )
18.Qxe3 Qb6!?; 19.Ng4, "~"
{Diagram?}
GM Nick de Firmian calls this as
... "a solid edge for White," ('+/=')
but I am not sure if I agree.
GM V. Topalov - GM A. Karpov; Super-GM Tournament,
Linares, ESP; 1995.
(Black won a brilliant game.)
[ See MCO-14; page # 428, col. # 85, and also note # (f.). ]
( I prefer: >/= 19.Qe2!, "+/=" {Diagram?} instead. ); )
*******
(Returning to the line with the
more aggressive move of 6.e4.)
6...Nxc3;
7.bxc3 cxd4; 8.cxd4 Bb4+; 9.Bd2 Bxd2+; 10.Qxd2,
"+/="
White is clearly a little better,
although this line is thought to
give Black
good drawing chances.
GM V. Tkachiev - GM I. Rausis; National Championship Tourney,
France-chT 0203, 2002.
(White won a fine game in only
39 moves.) ]
*************************
(We now return to the actual
game, after a brief foray into
the theory of this line.)
5...cxd4;
Black exchanges to avoid an
isolated pawn.
While some have criticized this capture here ... it looks very nearly forced to me.
[ Even worse was: 5...Bd6?;
6.cxd5 cxd4; 7.Qxd4, '±'
and White wins at least a
Pawn ... maybe more. ]
6.Qxd4,
('!') {Diagram?}
This looks best ... it prevents Black
from playing the central advance
of ...e6-to-e5.
[ Is taking with the Knight playable?
After 6.Nxd4 dxc4!?; 7.e3 e5;
8.Nf3,
{Diagram?} This might be best.
(</= 8.Ndb5?! a6; 9.Qxd8+!? Kxd8; 10.0-0-0+ Nbd7; 11.Nd6 Bxd6;
12.Rxd6 Kc7; 13.Rd1 b5; "=/+")
8...Qb6!?; 9.Qc2 Nbd7; 10.Bxc4,
"+/=" {Diagram?}
White is slightly better here. ]
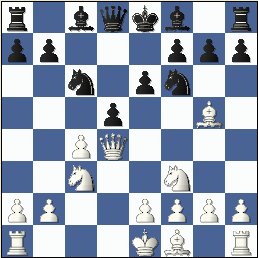
6...Nc6;
{See the diagram given just
below.}
This is probably the best move
here. (Despite what Reinfeld says,
who claims that ...Be7 was better.)
*************************
|
|
*************************
(r1bqkb1r/pp3ppp/2n1pn2/3p2B1/2PQ4/2N2N2/PP2PPPP/R3KB1R)
Lasker has had this position before ... and done quite well with it, thank you
very much. He might also be
wondering why Pillsbury would even
allow this variation.
(White's last outing
with this line, as far as Lasker is
concerned - was a bad loss to the
very same opponent.)
[ If 6...Be7!?; then
7.cxd5!, "+/="
{Diagram?}
with probably a small advantage for White. ]
7.Bxf6!!,
TN {Diagram?}
The big improvement ... which Pillsbury had patiently saved for Lasker for almost eight years.
Not only is this a surprise for Lasker, it even refutes what the World Champion had thought - and written - about this position.
This had to be VERY carefully worked
out by Pillsbury, as the loss of his
dark-squared Bishop is potentially
EXTREMELY dangerous for White.
(As the variation with ...gxf6; Qd2?,
followed by ...d4! clearly proves.)
'!' - GM Garry Kasparov.
"In the game between the same opponents at St. Petersburg 1895, Pillsbury had continued with Q-R4 and 0-0-0, soon obtaining an inferior game. Legend has it that he saved the text for ten years, to avenge the sparkling defeat Lasker inflicted upon him at that time!" - Fred Reinfeld. (From the book on the tournament.)
'!' - Fred Reinfeld.
****************************************
[ The very famous encounter went: 7.Qh4!? Be7;
8.0-0-0!?, {Diagram?}
To me, this is much too risky.
I think White had to at least try
to castle on
the King-side.
(Maybe better was: 8.e3)
8...Qa5!; 9.e3 Bd7!; 10.Kb1
h6!; "=" {Diagram?}
Black has already equalized ... and
went on to win one of his
very best
and most brilliant (& famous) games.
Harry N. Pillsbury - Emanuel Lasker; (Super) Master Quadrangular
Tourney,
St. Petersburg, RUS; 1895/96.
(Click
here
to see this famous contest!!)
---> *** The above game has
been reprinted an almost endless
number of
times - and in dozens of
books and game anthologies. ***
{Lasker often said this was his favorite and very best game.} ]
****************************************
7...gxf6;
This could be forced.
The funny part of this story - and a facet that is not very well known - is that Lasker said, in his chess magazine, that this position probably "clearly favored Black."
****************************************
[ Variation # 7B1.)
The following line looks to be much
better for Black, but upon deeper
inspection - it turns out to be a lot
better for White:
</= 7...Nxd4?!;
{Diagram?}
This looks like it wins material ...
but eventually White will trap the
Black Knight
in the corner.
8.Bxd8 Nc2+;
9.Kd2 Nxa1; 10.Bh4! Bb4!?; {Diagram?}
Black tries to use the pin to
extricate the Knight.
( Maybe Black should play:
10...f6!?; {Diagram?}
instead ... but this will not change
the fate of the stranded cavalry
on the a1-square. )
11.e3 Bd7;
12.Be2 dxc4; 13.Bxc4 Rc8; 14.Bd3 Nb3+;
15.axb3 f6;
16.Nd4! 0-0; 17.Nc2, '±' {Diagram?}
and White is probably (close
to) winning,
as he has two clear minor
pieces for the Rook he lost.
(At least "+/" ...maybe "+/-".)
***************
Variation # 7B2.)
</=
7...Qxf6?;
Black sets a trap, but it is weak
and easy to refute.
8.Qxf6 gxf6;
9.cxd5 Nb4;
This looks nearly forced.
( If </= 9...Ne7?; simply 10.e4, '±' )
10.0-0-0,
"+/=" (Maybe - '±')
White is up a pawn and will
retain it. I feel sure Black has
inadequate compensation here. ]
****************************************
8.Qh4,
The best square for the Queen.
(Some have given this move an exclam,
but it looks like the only good move for White at this point.)
Pillsbury has foreseen this position, he played his first 10-15 moves very quickly.
**************
[ Just terrible is:
</=
8.Qf4? d4!; "+/=" {Diagram?}
and Black is already better.
***
Even worse is: </=
8.Qd2?? d4; ("-/+")
{Diagram?}
Black wins a piece, for if White
moves his Knight, ...Bb4
will win
the White Queen. ]
**************
8...dxc4!?,
It looks ugly to open the game
in this fashion, but Black may not have any choice at this point.
*******
[ Even worse was: </=
8...d4?!; 9.0-0-0! e5; 10.e3,
'±' {Diagram?}
and White will win at least a
pawn ... and maybe more.
***
( The following variation clearly
demonstrates Black's problems:
10.e3 Bf5;
{Diagram?}
This could be nearly forced.
( Sergeant and Watts give ...Bc5; in this position. But this
move also
fails to solve Black's problems.
For example: </= 10...Bc5?!; 11.exd4 Nxd4!?;
{Diagram?}
Taking with the Bishop or the Pawn
is answered by the same move.
12.Nd5!, '±' {Diagram?} and White has a clear
advantage.
Most programs - like Fritz 8.0 -
consider White to be winning
("+/-") in this position. )
11.exd4 h5;
12.Bd3 Bg4; 13.Nd5! Bg7; 14.Rhe1,
'±' {Diagram?}
and White is nearly winning. (Maybe
"+/-") ) ]
*******
Lasker was famous for being able to avoid the worst ... ('damage control') ... but here it does not help him. (Pillsbury has analyzed this position very deeply.)
The next few moves (9-12) are all
the very best and or forced ... for both parties. (Kasparov seems to
agree, citing a game where White
played
Qxc4 on his 9th move ... and
Black had no problems.)
9.Rd1! Bd7; 10.e3 Ne5!;
Best ... according to the principle
that the player who is being attacked, (or is under pressure); should seek
to relieve problems by exchanges.
Kasparov says this is not the best and
instead gives the move ...f5 as being superior in this position. (But I do not
find his analysis to be convincing.)
{Reinfeld also criticizes ...Ne5 here,
and calls it time-wasting, but his analysis inspires ZERO confidence.}
*************************
[ Variation # 10B1.)
Some have suggested ...f5 here as
being much better:
10...f5!?; ('?!')
11.Qxc4!, {Diagram?}
Easily the most natural move,
and therefore also the best.
*******
( After the moves: </= 11.Qg3?! Qb6!; "=" {Diagram?}
my (deep) analysis of this position
indicates that Black
is already
equal ... and may even be better.
***
Interesting was: 11.Qh5!?, "~" {Diagram?}
with a rather vague position.
***
After the moves: 11.Qxd8+!? Rxd8; 12.Bxc4, "=" {Diagram?}
it is hard to believe either side
has much of an advantage. )
*******
11...Bg7;
{Diagram?}
The only move given by GK.
( ...Rc8 looked more natural. )
12.Qb3 Bxc3+?!;
13.Qxc3 Qa5!?; {Diagram?}
This does not look safe to me.
('?!')
( Maybe just 13...f6!?; instead? )
14.Qxa5 Nxa5;
15.Ne5 Ba4; 16.Rd4?, {Diagram?}
A terrible move ... passed on without
any comment by Garry.
(A check with
any analysis engine will probably
reveal that both
b3 and the move Rc1
are MUCH better!)
*******
( Why not the simple:
>/= 16.b3 Bc6!?;
17.b4 f6; 18.Nd3 Nc4;
19.Nc5 Bd5; 20.Bxc4 Bxc4; 21.Nxb7 Bxa2;
22.0-0 Bd5;
23.Nd6+ Kf8; {Diagram?}
This is virtually forced.
( Not </= 23...Ke7?; 24.Nxf5+!, {Diagram?}
which simply drops a Pawn. )
24.f3,
"+/=" {Diagram?}
A simple check with any strong
chess engine will reveal White
is
clearly better. (If now ...Rd8?;
then simply 25.Nxf5!, exf5; and
now
e4 wins back the material
with a very distinct edge for
White.)
Several computer tests
of this position clearly show that
White
prevailed the majority of the
time.
(The second player has multiple weaknesses in his pawn structure.); )
*******
16...Nc6;
17.Rxa4 Nxe5; 18.Bb5+?! Ke7!;
"~" {Diagram?}
... "with equal chances," ("=")
according to GM Garry Kasparov.
Duz-Khotimirsky - Znosko-Borovski; St. Petersburg, Russia; 1905.
[ See the book: "My
Great (chess) Predecessors," by (former) World Champion
& GM, Garry K. Kasparov.
Chapter Three (Number # 3),
'Emanuel The Second.' Page # 136, column # 1.]
**************
Variation # 10B2.)
The continuation of: 10...Be7; ('!?')
{Diagram?}
(This move was originally
suggested by Reinfeld
and
later heralded by M. Euwe.)
11.Bxc4 Qb6!?;
('?!')
Maybe ...Rc8; instead?
***
( Instead Kasparov gives the
following continuation:
</= 11...Qa5?!; 12.0-0 f5?!; ('?') 13.Qf4!? 0-0-0!?; "cp"
{Diag?}
claiming that ... "Black has
clear counterplay." - G.K.
Fuster - Cuellar; Havana, 1966.
But now simply Nb5, "+/=" gives White
a very healthy edge
in this position. {A.J.G.} )
***
12.Rd2!? 0-0-0!?;
13.0-0, "+/=" {Diagram?}
as recommended by Reinfeld
leaves White with a very decent
and solid advantage. (Maybe - '±')
I conducted literally DOZENS of
"computer-vs.-computer" tests
from this position ... White won the
overwhelming majority of these
experiments. ]
*************************
11.Nxe5! fxe5; 12.Qxc4!,
There is no escape for Lasker ...
who would like to exchange Queens, if only he could.
[ Or 12.Qxd8+ Rxd8;
13.Bxc4, "=" ("~") {Diag?}
and the position looks very balanced. ]
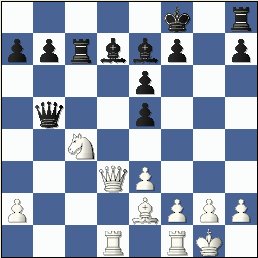
12...Qb6!?,
{See the diagram just below.}
Lasker probes White's Queen-side,
and also puts out some 'feelers' in
this position.
('Do you want a draw?'
'Do you really want to sacrifice a
pawn?' ... ... ... and ...
'How do you feel today?')
*************************
|
|

*************************
(r3kb1r/pp1b1p1p/1q2p3/4p3/2Q5/2N1P3/PP3PPP/3RKB1R w)
While this move was harshly criticized by some writers as "a premature excursion of the Black Queen," my deep computer analysis might suggest that this was the only move which could yield Black any winning chances at all. (Lasker thought for a long time before playing this move.)
If you have studied Lasker's games, you will know that he rarely was satisfied with a purely passive defense, with no chance of a victory.
[ I have an entire notebook filled with my thoughts and analysis concerning this game.
I shall spare you the long version,
but after a simple continuation
like:
12...Be7!?;
13.Qg4! a6; 14.Be2 Rc8; 15.0-0 Kf8!?; 16.Rd2!,
'±' {Diag?}
you don't have to be a GM to
see that White is clearly better -
and that Black
has been prevented
from castling. ]
13.Be2!,
(Probably - '!!')
A really fine move by Pillsbury.
Just how much courage it took to play this can readily be seen ... in some lines White has to sacrifice BOTH of his Queen-side Pawns!
'!' - GM Garry Kasparov. '!' - Fred Reinfeld.
[ Or 13.Rd2!? Bc6; "~" {Diagram?} but Black seems OK here. ]
13...Qxb2!?;
(Maybe - '?!')
As a mathematician, Lasker might
have thought: "Having stated 'A,' I
must logically follow with 'B' in this
position."
This has been heavily condemned
by some writers ... but is it so bad? Is it wrong to possibly take a risk ... if ALL of the other variations
...
very
clearly favor White?
'?' - Dr. S. Petrovic. '?' - Fred Reinfeld.
Strangely -
Kasparov allows this
particular move to pass without any
mark at all ...
or any comment as
well. (Odd - this is a VERY critical
move/moment of this game.)
"Underestimating the attack which
now follows." - J.N. Pope
(Possibly quoting Reinfeld?)
Having now spent close to six months on this game, I can safely say that this was definitely the critical move. Lasker probably should not have taken this pawn. (But you should also understand that this was often the Lasker method, he would choose to mix it up and make things difficult and more complex most of the time. Going quietly was NOT Lasker's way to handle a defence. Anyone who has carefully studied the games of this great player should be able to verify this.)
*************************
[ Variation # 13B1.)
After the relatively simple line:
13...Be7!?;
14.0-0!,
It is best to simply castle here.
(Forget the b-pawn, and the half-open g-file in this position!)
( Interesting was: 14.Rd2!? )
14...Rd8;
15.Qe4!, "+/=" ('±') {Diagram?}
White is very clearly better here -
in this position.
**************
Variation # 13B2.)
Black should not play ...Qb4; here,
as the 2nd player comes out on the
short end of the stick.
E.g., </= 13...Qb4?!;
14.Qc7! Bc6; 15.Bb5!,
15...Bxb5;
16.Qxb7! Rd8; 17.Qxb5+ Qxb5; 18.Nxb5,
'±'
White is clearly better here.
("+/")
In fact I sent this position to an
on-line chess teaching service.
{The first game is free.}
The comment was that,
"Black
probably cannot hold this ending."
**************
Variation # 13B3.)
The best continuation for Black
is probably:
>/=
13...Bc6!; 14.Bf3!? Bxf3; 15.gxf3 Be7!?;
Black tries to develop.
*******
Or Black can try:
a).
Maybe just 15...a6!?;
"~"
and Black is probably OK.
*****
b).
But NOT: 15...Qxb2?;
This is a bad mistake.
16.Rb1! Qa3;
17.Qb5+ Ke7;
This is probably forced.
***
( Obviously much worse was:
</= 17...Kd8??; 18.Rd1+ Ke7;
This is now forced.
(</= 18...Kc7?; 19.Rd7+ Kc8; 20.Qxb7#)
19.Ne4 Rd8!?;
Otherwise Black loses a whole
Rook after Qxb7+.
(White also
threatened Qd7 mate as well.)
20.Qxb7+ Ke8; 21.Nf6#. )
***
18.Qxe5; ("+/-")
and Black cannot successfully
meet all the threats.
(Rxb7+,
Nd5+, and even QxR/h8.)
*******
(Returning to the main analysis
line here.)
16.Qa4+ Kf8!?;
17.Rd2, "+/=" {Diagram?}
and although White has a very
slight advantage, I think Black
should be able to draw.
{eventually}
This would have been a definite
improvement over the game. But I
also am willing
to confess that this
line is not perfect - an improvement
might be found to strengthen
the
first player's play. ]
*************************
14.0-0!,
This is clearly the best move for
White. Pillsbury was still moving
fairly quickly, so we can safely
assume that this was all part of
the great American player's preparation.
I was the first to award this move an exclam - in an article I did for a state chess magazine over 15 years ago. (*** also ... '!' - GM Garry Kasparov.)
[ Very interesting was: 14.Qc7!?
Bc6; 15.Qxe5 Rg8; 16.Bh5!, "--->"
(Possibly unclear?)
{Diagram?}
when White has a strong
initiative.
But whether or not it is 100% clear
that White will come out on top ...
with best play for both parties ...
I cannot really say for certain.
Note: One of the things that will
affect the LONG-TERM evaluation
of this position ... where will White
place his King? ]
14...Rc8;
This is probably the best move for
Black - the other alternatives are clearly and demonstrably worse.
*************************
[ Variation # 14B1.)
After the continuation:
</= 14...Bb4?!; ('?')
15.Nb5! Rc8; 16.Nc7+! Ke7; 17.Rb1 Qc3;
18.Qh4+ f6; 19.Rfc1! Qd2!?;
20.Qxb4+ Qxb4; 21.Rxb4, "+/-"
{Diag?}
Black has only managed to achieve
a lost position.
*******
Variation # 14B2.)
Black also gets a very bad game
after the continuation of:
14...Bc6?;
A natural move, Black seeks to
move the Bishop off the (always
dangerous)
d-file and possibly
exploit his own half-open g-file.
But the idea has a tactical flaw.
15.Bh5! Be7; 16.Qxe6 0-0;
17.Qxe5, '±'
White is clearly MUCH better here,
(possibly "+/-");
Black is a Pawn
down ... and has a rotten position.
*******
Variation # 14B3.)
Also not to be recommended for
Black was:
</=
14...Rg8!?; ('?!')
One article in a newspaper column
of that period (Philadelphia) actually
claimed that ...
"this was a great improvement
over the game."
(Black has more than
one threat! The idea was attributed
to the American, J. Barry.)
But White gets there first!
15.Rxd7!! Kxd7;
16.Rb1! Qxb1+;
This is forced.
( Not: 16...Qa3??; 17.Rxb7+, {Diagram?}
and White mates in two or
three moves. ("+/-") )
17.Nxb1 Rc8; 18.Qb5+ Kd8; 19.Qxb7, ("+/-")
and now the win is only a matter
of technique here. ]
*************************
Now the next two or three ply
looks to be forced.
15.Qd3 Rc7; '[]' {Diagram?}
Black definitely had to play this. (It also looks to be the most flexible.)
*************************
[ Var. # 15B1.)
Of course not: </=
15...Rxc3??;
If this move were to be played,
it would be a terrible blunder.
(Taking with the Queen has the
same consequences.)
16.Qxd7#.
*******
Var. # 15B2.)
Another disaster for Black is:
15...Bc6!?; 16.Bf3 Bxf3??;
This is obviously a mistake.
( G. Marco says Black must play the move: >/= 16...Be7!?; instead. )
17.Qd7#. (Ouch!);
*******
Var. # 15B3.)
Maybe playable was: 15...Rd8!?;
16.Bf3!? Qb6;
17.Qe4 Qc7;
18.Rc1, "/\" {Diagram?}
White has tremendous piece
activity, but what the outcome of
this particular position should be ...
is not really clear. ]
*************************
16.Ne4,
The correct move.
(And almost worthy of an exclam
in this position.)
[ Many of my students ask the question,
"Why not Nb5 here?" But the move,
which at first glance looks promising,
is met rather simply:
</=
16.Nb5!? Qxb5!; 17.Qxb5 Bxb5; 18.Bxb5+
Ke7!; "~"
Black is a Pawn up in a position
where there are opposite-colored
Bishops.
(Black is probably OK.) ]
16...Be7;
This looks forced.
*******
[ Not 16...f5??; because 17.Nf6+, ("+/-") and White will win.
***
Kasparov points out that: 16...Qc2!?;
17.Nd6+?! Bxd6;
18.Qxd6
Qc5; "~" may be an adequate defense. ]
*********
17.Nd6+,
This is probably the best way for
White to proceed from this point.
[ Kasparov says that the position reached after the continuation of:
17.Rd2!? Qb6;
18.Rb1 Qc6; 19.Bf3!? Qa6!; 20.Qxa6 bxa6;
"~" {D?}
might be "a tenable endgame"
for Black, but I would have an
uneasy
position about this position
if I were the second player here. ]
17...Kf8;
('!')
This looks to be Lasker's best bet.
[ Obviously worse was: </=
17...Bxd6?!; 18.Qxd6,
"+/=" {D?}
18...Qxe2??;
A mistake but played to illustrate
a point here.
( Or 18...Qb6; 19.Qxe5, '±' {Diagram?}
and White has the clearly superior
position.
- GM Garry Kasparov.
(His analysis continues on for
many more moves, but a check with
any analysis engine will surely
confirm White is much better here.)
Or </= 18...Qc3?; 19.Bb5!, "+/-"
{Diagram?}
- Jacques N. Pope. )
19.Qxc7, "+/-" and White will win. (easily) ]
18.Nc4,
('!')
The correct move ... Kasparov,
(and many others); give this move
without any comment or mark of
any kind. (This is strange as Rd2,
Bh5, and f4 all looked promising.)
[ Interesting was: 18.Bh5!? (Is White better here?) ]
18...Qb5;
{See the diagram given just below.}
The correct move here. (Black had to protect the Pawn
on the e5-square.)
***
Editors
note:
Dozens of sources give conflicting game scores for this
epic contest. MOST databases - at least when I first started on this game - gave the wrong
score!
No less than E. Winter covered this matter in his "Chess Notes." Also
Tim Harding covered this matter - deeply! - in an article on this game on the "Chess
Cafe" web site.
This note added: Sunday; May 09th,
2004. (Go here
for more information.)
*************************
|
|
*************************
(5k1r/pprbbp1p/4p3/1q2p3/2N5/3QP3/P3BPPP/3R1RK1 w)
At this point, I would be very curious to know how Lasker assessed his position ... equal, or worse?
[ Simply inferior was:
</= 18...Qb4?!;
19.Nxe5!, "+/="
and White is clearly a little
better.
(The book on Lasker by
Ken Whyld incorrectly gives the
move ...Qb4 here.);
***
The position that is reached after
the moves: 18...Qxa2!?; 19.Nxe5,
"+/="
looks very dangerous for Black.
---> But months of analysis ... failed
to reveal any forced win for White. ]
White to move ... what move would you make if you were playing this game?
19.f4!!, (thematic?)
{Diagram?}
A truly brilliant move ... considering
there might have been at least one
other continuation that was VERY
promising for Pillsbury here.
'!' - GM Garry Kasparov. '!' - Fred Reinfeld.
In a way, this move is also the most logical ... White wishes to open the f-file against the Black King.
*******
[ Interesting was: 19.Rb1!?, with great play for White.
***
I have a very deep analysis that
indicates the move 19.Qe4!,
"+/="
will give White good play against
Black's very weak pawn structure.
(My line here is close to 30 moves
long. It is VERY complicated ... and
has
MANY branches! In the final
proof of this game, I decided not to reproduce
it here.) {A.J.G.}
NOTE:
I first saw 19.Qe4! and
analyzed it out to a win as a
teenager.
(I even wrote several
chess magazines about my
discovery.)
But before I publish
any analysis I should insure that
it is basically "air-tight." ]
*******
19...exf4!?; (Maybe dubious?)
I don't think it is a good idea for Black
to open the file here ... (Reinfeld echoes this opinion);
yet it is difficult to come up with anything that is clearly and/or
demonstrably better.
(Kasparov questions this, but the line he gave as superior leaves White with a very solid advantage ... and Black with little counterplay.)
*************************
[ Var. # 19B1.)
Black can avoid the opening of
the f-file by playing:
19...e4!?;
20.Qd4 Kg8; 21.Rd2 Qc5; 22.Qxe4,
"+/="
but it costs him a pawn to do so.
**********
Var. # 19B2.)
Another continuation is:
19...Qc5!?;
20.Nxe5 Be8!?;
Probably the safest move.
21.Qe4! h6!?,
Black prepares to occupy the
half-open g-file.
( Or 21...Rg8; 22.Rf2!, "+/=" )
22.f5 Bg5;
23.fxe6 Qxe3+; 24.Qxe3 Bxe3+; 25.Kh1 Kg7;
26.h4! fxe6!?;
Black decides to rid himself of
the pesky e-pawn.
( If 26...Rc2!?; then
27.Bb5!!, "+/="
(If Black captures on b5, he is
mated in three moves.) )
27.Rd3!,
'±'
& White has a very strong
attack.
(If ...Bb6; then Rg3+ may win on
the spot for White.);
**********
Var. # 19B3.)
Black could also try:
19...Bc6!?;
20.fxe5 Qd5; 21.Qxd5 Bxd5; 22.Nd6,
"+/="
and any strong program will show
that White has a fairly substantial
edge
in this position. (This is the line
that Kasparov claimed to be much
better
than the game.) ]
*************************
20.Qd4!,
With virtually the precision of a
computer ... Pillsbury once again
shows the correct path.
'!' - GM Garry Kasparov. '!' - Fred Reinfeld.
[ It is entirely possible that the
line, beginning with the move: 20.Rxf4!?,
"+/="
leads to a position where White
also has a fairly solid edge. ]
20...f6; {Box?}
{Diagram?}
As a teen-ager, I questioned this
move, (believing ...Kg8 to be
better); but now I see that this play
is <basically> forced for Black.
[ </= 20...Rg8??; 21.Qxf4, "+/-" (White is winning.)
</= 20...fxe3??; 21.Qxh8#. (Its mate.)
</= 20...Kg8?; ('??') 21.Qxf4! Be8; 22.Qxc7, ("+/-") and White wins.
</= 20...e5?;
21.Nxe5! Qxe2[]; 22.Nxd7+ Kg8; 23.Qxf4 Qh5;
24.Qxc7,
"+/-" {Diagram?} (White has a
won game.) ]
21.Qxf4!,
The most natural move ... and
definitely the best.
'!' - Drazen Marovic.
[ With the move: 21.Rxf4!?, "+/=" White prepares to double Rooks on the f-file, and retains a solid edge. ]
White has all kinds of nasty threats, but Ne5, with a big discovery, is definitely the biggest threat Lasker has to consider here.
Lasker's solution is both simple and elegant ... he ignores his development, guards d6 a second time, and also avoids the possible attack by B/on-e2.
21...Qc5!; {See
the diagram given just below.}
The crafty fox - Lasker - seemed
to always find the best defense in
almost every position.
(Several
disasters awaited Lasker here, but
he avoids stepping on any of
Pillsbury's land-mines.)
*************************
|
|

*************************
(5k1r/pprbb2p/4pp2/2q5/2N2Q2/4P3/P3B1PP/3R1RK1 w)
It is entirely possible that Lasker really thought he was OK in this position. (Black only needs one or two moves to establish his counterplay.)
**************************************************************************
[ The most natural-looking move
was ...Rc8; but that move meets
a truly spectacular refutation:
21...Rc8!?;
22.Ne5!!,
A brilliant riposte. And one that
wins decisively.
***************
a). Kasparov only gives the
following - grossly inferior -
line ...
in this position: 22.Qd4?! Bc6?; ('??')
Horrible, the move ...Qd5 was
practically forced here.
(This one
move changes the position's
evaluation by five-to-TEN points!!
This is simply ridiculous.)
*******
( If Black refused to resign, he
had to play the continuation:
a1.)
22...Rxc4; 23.Bxc4 e5!?;
and lose his Queen here.
***
Most programs say that the
move:
a2.)
22...Qd5[]; is forced in this position. )
*******
23.Rxf6+!, ("+/-")
and of course White wins.
**********
b). The continuation of:
22.Qh6+! Kg8[]; 23.Rf4!!; ("+/-")
is also much better than the
move given by Kasparov.
***************
Now the following line is very
close to being forced for both
sides here:
22...Qxe2;
23.Nxd7+ Kg7; 24.Nxf6 Qxd1; 25.Qg5+! Kf7;
26.Rxd1 Rc5;
27.Qh6 Bxf6;
28.Rd7+ Be7; 29.Rxe7+! Kxe7; 30.Qg7+, ("+/-")
and White wins the Rook on h8
and should win rather handily.
*************************
Of course not: </= 21...Rg8??; 22.Qxc7, "+/-" with a winning material edge. ]
**************************************************************************
Given enough time ... Lasker's two Bishops and half-open g-file might mean something ... but Pillsbury reacts very rapidly with a series of sharp moves that does not allow Black the time (that) he requires.
22.Ne5!,
The best move - either Lasker had
overlooked this shot, or simply he
had underestimated its impact.
'!' - G. Marco. (Schach Zeitung)
(Kasparov gives this move without any mark or comment.)
The
move Rf3!? ... preparing Rxd7, Rxd7;
and then Qb8+ is also interesting.
[ The move:
22.Nd6!?,
"+/="
led to very interesting positions
that all seem to favor White.
(If ...Kg8; then simply Rf3!);
White could also play: 22.Rf3!?,
"~"
which a long analysis indicates
may work out to a small advantage
for White from this position.
********************************************************************************************
White could also try: 22.Qh6+!?,
here.
(Many people have suggested this
move to me over the years.)
22...Kg8; {Box?} Now this looks forced.
( </= 22...Ke8?; 23.Nd6+ Bxd6; 24.Bh5+ Qxh5[];
Otherwise - Black is mated. 25.Qxh5+ Ke7; 26.Qg4, "+/-" )
23.Bh5!,
(now) "Black seems lost." - R.H.
(The main threat is Nd6, {...BxN/d6}
followed by RxP/f6, winning.)
(Or 23.Rxf6!? Bxf6; 24.Qxf6, "+/-")
23...Bb5;
(Probably best.) {Diagram?}
This looks like Black's best (only?)
try here.
( </= 23...Qxc4?; 24.Rxf6! Bxf6; 25.Qxf6 e5[]; 26.Rf1, ("+/-") )
and now the move: 24.h4!!,
"+/-" {Diagram?}
wins easily for White. [The main point is to keep the Black Queen
off
of the g5-square; only a genius, (or a computer); would ever even
consider such a move.]
The computer shows that, in order to avoid an almost certain mate,
the second party must give up his Queen
here - with 24...QxB/h5.
(Another option was: (</=) 24.Nd6!? Bxd6; 25.Rxf6 Qe5;
26.Rxd6 Qxd6;
27.Qg5+ Rg7; 28.Bf7+ Kf8; 29.Bxe6+ Ke8; 30.Qxg7 Qd1+; 31.Kf2 Qd2+;
32.Kg3 Qxe3+; 33.Kh4! Kd8!?; 34.Qxh8+, and White wins. ("+/-")
) ]
22...Be8;
{Diagram?}
I think I can say this was forced
with almost a 100% certainty.
[ Much inferior for Black was: </=
22...Ba4?!; 23.Rd4! Bb5?;
It looks natural to save the piece,
but now watch what happens ...
( If >/= 23...Rg8; then simply 24.Rxa4,
("+/-") {Diagram}
and White should win.
(Rc4 may also win as well.) )
24.Qh6+ Ke8; 25.Bh5# ]
23.Ng4!,
very good! (Maybe - '!!')
{Diagram?}
There is no doubt in my mind that
this move deserves an exclam ...
especially seeing that White had
(at least!) TWO (2) other possibilities
which also yielded a sizeable
advantage to the first player.
(See the lines below.)
*******
[ After the moves: 23.Qh6+!? Kg8;
24.Ng4, "+/="
White has a fairly sizeable edge.
(This differs from the game as
Black has ...Qg5! in this position.);
***
Also - the (former) World Champion
gives the following line:
23.Rd4!? Rg8;
{Diagram?}
There seems to be little else
{positive} that Black can play
in this position.
( Probably even worse was: </= 23...Kg7?!; 24.Ng4 e5;
25.Qh6+ Kg8;
26.Bc4+, "+/-" {Diagram?} "and (White) wins."
- GM Garry Kasparov. )
24.Rc4 Qd5; 25.Bf3 Qxe5; 26.Qxe5 Rxc4;
27.Qxe6, '±'
("+/" ... Maybe even "+/-") and White is clearly better here.
Analysis line by - GM G. Kasparov. ]
*******
23...f5;
This looks absolutely forced to me,
and is the first choice of many strong chess programs here.
********
[ Instead, a brand-new book gives
the following line as
an improvement for the second player:
</= 23...Bg6!?; ('?!')
Kasparov gives this move an
exclamation mark ...
but it looks
like it was based on faulty analysis.
24.Nxf6,
This looks to be the best.
( Interesting was: 24.Rd4!?, "+/=" )
24...Kg7; 25.Nd7 Qc3; ('!?')
It is possible that ...Qa5; is a
better defense in this position.
(Maybe 25...Qa5!?; {Diagram?} is worth a try?)
26.Rd4, '±'
("+/")
White is clearly much, much, much
better here - most chess programs
give this position as completely
winning ("+/-") for White.
( Instead Kasparov gives the move: </=
26.Bg4?,
"+/=" (Maybe - '±') {D?}
which is better for White, but is
HUGELY inferior to Rd4. ) ]
*******
24.Qh6+ Kf7;
Apparently this is forced.
[ Instead, Black could also play the
move ...King-to-Knight-One ...
(...Kg8); but this try is dispatched
with relative ease:
</=
24...Kg8?; 25.Qxe6+ Kg7;
This looks to be forced.
( Instead Reinfeld gives the following
line ... but it is clearly inferior:
</= 25...Bf7?!; 26.Nh6+ Kg7; 27.Qxf7+! Kxh6; 28.Rxf5 Qxe3+?; {D?}
Black had to give up the Queen
here to avoid being mated.
29.Kh1 Qxe2; 30.Rd6+! Bxd6; 31.Qf6#. {Diagram?}
A cute mate by Reinfeld. {Pope attributes this to Chernev?} )
26.Rd5 Qb6;
27.Qe5+ Kg8; 28.Rxf5 Bf7!?; 29.Rxf7! Kxf7;
30.Qxh8,
("+/-") A check with any strong analysis
engine will
confirm this is a totally
winning position for White. (A "plus-ten" ... or more points.)
]
25.Bc4!!,
An ultra-brilliant move ... and even
praised by Garry Kasparov as ... the "right way" to proceed.
'!!' - GM Garry Kasparov. '!' - Fred Reinfeld. '!!' - Jacques N. Pope.
*******
[ Also very good for White was:
25.Rc1! Qxc1;
26.Ne5+ Kg8; 27.Rxc1 Rxc1+; 28.Kf2
Bg6;
Trying to cut off the White Queen
from e6.
( </= 28...Rc2??; 29.Qxe6+, "+/-" )
29.Nxg6 hxg6;
30.Qxg6+ Kf8; 31.Qxe6, '±' (Maybe "+/-")
and White is clearly much better.
***
Kasparov points out the line:
</=
25.Rxf5+!? Qxf5;
This appears to be forced.
( </= 25...exf5?; 26.Bc4+! Qxc4[];
The only move that does not
allow White to mate Black.
27.Ne5+, ("+/-")
followed by NxQ/c4, and White
should be winning here. )
26.Rf1 Rc5!; "=" is "unclear" according to Kasparov. ]
*******
25...Rc6;
This too - is apparently forced.
[ Of course not: </=
25...Qxc4??; 26.Ne5+, ("+/-")
and Black gets forked. ]
26.Rxf5+!!,
A very brilliant move, and not at
all obvious.
(White had several other
moves to consider, at least two of
which give White a clear advantage.)
White gives up TWO Rooks for the Queen ... if things go sour, White could find himself with a lost game. (!)
My very deep analysis indicates that this is ... ... ... BOTH BEST AND THE QUICKEST METHOD ... to force Black to capitulate.
'!' - GM Garry Kasparov. '!' - Fred Reinfeld. '!' - Jacques N. Pope.
[ Playable was: 26.Qh5+!?, "+/=" (White is a little better.) ]
26...Qxf5;
Of course this is forced.
[ </= 26...Kg8??; 27.Bxe6+ Rxe6; 28.Qxe6+ Kg7; 29.Rxc5, "+/-" ]
27.Rf1,
"Because of the exposed position
of the Black King, the two Rooks
are no
compensation for the Q." (Q = queen.) - Fred Reinfeld.
27...Qxf1+;
Once again ... Black is left without
any really better choice of moves.
[ Even worse was: </=
27...Rxc4?!; 28.Rxf5+ exf5; 29.Ne5+, ("+/-")
After the forced ...Kg8; then
simply Qe6+! wins massive
amounts of material. ]
28.Kxf1!,
This is much better than the
near-cowardly Bxf1.
[ Possible was: 28.Bxf1!?, "+/=" ]
28...Bd7!?,
Black struggles to free his trapped
Rook. Black MUST hurry, his King is
in very dire straights here.
[ </= 28...Rxc4?; 29.Ne5+ Kg8; 30.Qxe6+ Kf8; 31.Qxc4, "+/-"
Or </= 28...Rg8; ('????') 29.Ne5# ]
Now it only takes a finishing touch
by the great Pillsbury.
29.Qh5+!,
Once again the best move in a
position where Pillsbury had at
least one other (possibly) winning
line ... and more than one way to
go wrong.
"Stronger than Kt-to-K5, (Ne5+) check" '!' - Fred Reinfeld.
[ Also winning for White was: 29.Ne5+!? Ke8;
30.Nxc6 Rf8+; 31.Ke2,
31...Bxc6;
32.Qxh7, ("+/-")
but Pillsbury's method has to
be a whole lot better. ]
29...Kg8;
This looks forced to me.
[ Even worse for Black is: </=
29...Kg7?; 30.Qe5+ Kg8; ('?')
The only move given by one
author in this line. (Reinfeld.)
( Or 30...Kg6!?; 31.Bd3+, ("+/-") etc.
(But White is winning very
easily here ... in this position.) )
31.Nh6+ Kf8; 32.Qxh8#. (and) Black has been mated. ]
30.Ne5,
("+/-")
Black Resigns ... his game is
completely hopeless.
(The computer
says that this position is simply mate
in five-to-seven moves.)
*******
[ In the following continuation: 30.Ne5 Kg7;
This appears to be forced.
(If 30...Be8?; then 31.Qxe8+, and Black can resign.)
31.Qf7+!,
White goes for the jugular.
(White can win material with: 31.Qg4+ Kf8; 32.Nxd7+ Ke8;
33.Ne5, "+/-" with a won game.)
31...Kh6; 32.Ng4+ Kg5; 33.Qg7+! Kh5;
This is forced.
( </= 33...Kf5?!; ('?') 34.Bd3# )
34.Nf6+! Bxf6; 35.Be2+ Kh4; 36.Qh6#.
and Black is check-mated.
(White had like three different
"mates-in-one" on the last move!) ]
*******
To say this is an extremely brilliant
game is a vast under-statement ... and fails to do this contest any real
justice.
(The more I study this game, the more I like it. And every time I
look at it, I see something new that
I had not seen before.)
Is this Pillsbury's best game?????
(Lasker - the reigning World Champ,
- is beaten in an incredible contest.)
While I do not feel I am competent
to say so with complete authority, I
certainly feel you would be hard-pressed to find a game that was
superior to this magnificent gem.
"This game was played throughout by Pillsbury in a very grand manner." - Fred Reinfeld.
**********************************************************************************************************
BIBLIOGRAPHY:
I have about 5-10 books on Pillsbury,
many of them are not in English. I
also have seen this game in print
more times than I care to count.
I consulted the following books ... in the order given ... to annotate this
truly wonderful and incredible game.
(I also want to thank various
students who photo-copied documents, old magazines, newspaper articles, etc; from various
libraries and archives.)
# 1.) "The Collected Games of
(the great) EMANUEL LASKER, by (the late)
Ken Whyld.
Copyright (c) 1998, by the author.
Published by the Chess Player.
ISBN: # 1-901034-02-X
(This book incorrectly gives the
move, 18...Qb4; for this game.)
# 2.) "Velicki majstori saha,"
'The great H.N. Pillsbury.'
(This is book number four {# 4}
in this particular series.)
By Dr. S. Petrovic.
Series edited by Drazen Marovic.
Copyright (c) 1971 by the author.
Published by Sahovska Naklada.
(Zagreb, Yugoslavia.)
# 3.)
"The Games of the great
American Master,
Harry Nelson Pillsbury."
(Informant style book. It seems
dozens of Yugoslav Masters may have contributed to this book.)
# 4.) A book on Pillsbury in German.
(Your guess is as good as mine who
the author is, I can barely follow the moves - much less the notes.)
(I also have a book on Pillsbury that
was sent to me - written in Russian!)
# 5.) "The Chess Career of
Harry Nelson Pillsbury," by P.W. Sergeant
and W.H. Watts.
(Many say this is the finest Pillsbury
book out there.)
# 6.) The Book of the Tournament.
"Cambridge
Springs International
(chess) Tournament, (USA) 1904." By Fred
Reinfeld. Copyright (c) 1935.
Published by Black Knight Press, NY.
(Thanks to
{at least} one person - who sent me
a complete photo-copy of the entire
book!)
# 7.) "Harry Nelson Pillsbury,"
('American Chess Champion') by Jacques N.
Pope. Copyright (c) 1996.
Published by 'Pawn Island' Press,
Ann Arbor, Michigan. (USA)
(Printed by the Russett Co. Inc.
OH Distributed by Lindsay.)
# 8.) Game #
42, page # 136. The book: "My
Great Predecessors," (Part
I) by (former) World Champion
& GM, Garry K. Kasparov.
Copyright (c) 2003 by both the
author and the translator. (KN) Published by EVERYMAN Chess.
ISBN: # 1-85744-330-6
# 9.) I also must thank several {former} students who dug up a lot of old stuff out of newspapers and chess magazines of the period.
(I also checked the following book: "Pillsbury, The
Extraordinary," by GM Andrew Soltis and FM Ken Smith.
Copyright (c) 1990,
Published by Chess Digest of Dallas, Texas.
ISBN: #
0-87568-187-5. This game is not in there, but I checked it for the sake of being
complete and thorough.)
# 10.) The CB website examines this game.
Copyright (c) A.J. Goldsby I.
Copyright (c) A. Goldsby, 1973-2003. Copyright (c) A.J.G;
2004.
***
(Code Initially) Generated with ChessBase 8.0
1 - 0
Want to see more of the great Pillsbury's games? {annotated} Then click HERE or HERE!
Click here to go/return to my domain. There is no site map, but you can click here.
Click here
to go to - or return to - my page of:
ANNOTATED GAMES, (Angel-Fire 2) Page #3.
Click here to go to my (main) "Recent GM Games" page.
***
Click here
to go to, (or return to) my
"Best Games Page" on my Geo-cities
web site.
***
Click here to go to Steve Etzel's excellent site on CS1904.
(Or use the "back" button on your web browser.)
(To contact me concerning this analysis, click here.)
This is a page I started on many times. I even had a short (annotated) version posted on another server, but that site was closed because that company stopped offering free web pages. I finally finished this page in connection with my research of the player Pillsbury, and my endless fascination with the chess tournament, Cambridge Springs, 1904. A truly great game! And perhaps even Pillsbury's best. Incredible.
I have worked on and analyzed this game for years. This game has been an active project of mine for at least 5-7 years, although I have started on it ... and then laid it aside many times. I have been actively working on this game ... on a fairly regular basis ... for over a year now.
This page was first
posted, (here): in September, 2003.
Final/finished posting: Thursday;
October 16th, 2003.
(I was working on finishing many other projects during the interim.)
This page was last updated on 08/20/10
. Last edit/save on Friday, August 20, 2010 03:00 AM
.
***
Please be sure to drop me a short e-mail and tell me what you think!
One sample e-mail - from hundreds that I have had that concerns this game.
To: LifeMasterAJ@yahoo.com
From: "Rik" .... (deleted, to
protect this person's privacy)
Subject: 22. Qh6+!?
Date: Wed, 01 March, 2006 / 00:39:10 +0100
*******************************************************************************************************************************
Dear Mr. Goldsby,
Great job you did on analyzing Pillsbury-Lasker. Truly a work of love and devotion, worth a brilliancy price in itself!
Playing over the moves on SigmaChess/Hiarcs (a free or almost free program for Mac OS) the machine suggests
22. Qh6+ (instead of the famous 22.Ne5)
(He goes on to provide some fair analysis, although I found several significant improvements.)
Best regards, Rik (Amsterdam, NED)
Copyright (c) A.J. Goldsby I
Copyright (c) A.J. Goldsby, 1979 - 2009.
Copyright (©) A.J. Goldsby, 2010. All rights reserved.
|
|