GM B. Spassky
(2700) - GM L. Polugayevsky
(2650)
|
|
|
*************************
Just about all the players in the hall felt that Black was OK here.
Now comes one of the most amazing and shocking chess moves played in a
game ...
and one that was missed by most of the masters that were watching this
encounter.
(Was Tal around?)
17.Bxe6!!,
(Really - '!!!' or even
'!!!!')
Quite simply - one of the most
brilliant moves of all of Spassky's
whole career.
(As Black has a Knight
already protecting the e6-square ...
and because White's own
e-file is
blocked by a Pawn on e5 ... many of
my students don't understand how
this move is even possible.)
Many of the players in the hall felt
that Spassky had sacrificed a little
speculatively here,
but this sack is
definitely 100% sound.
[ Or 17.Rf1!? 0-0; "=" {Diagram?} and Black is fine. ]
17...0-0!?;
{Diagram?}
"A sad decision, now KB5 is weak." - Andy Soltis.
If Black tries to take (and win) a piece on the e6-square, he gets murdered.
Without getting technical, this move
could be an inaccuracy.
But the
complications are enormous here.
*****************************************************************************
[
Maybe better was: >/=
17...Qd8;
"~" {Diagram?}
but White might be able to sack
on f7 ... and gain a perpetual
check.
(Is this why Black avoided
this move? If so ... Polugayevsky
made a
terrible error in judgment.);
***********************************************************
Much worse for Black was:
</= 17...fxe6?; 18.Nxe6! Bf3!?;
{Diagram?}
This could be forced, many
of the alternatives at this point were 1000
times worse for
Black!
***
( Or if: 18...Rd8!?; then 19.Nxg7+!, with a winning ("+/-") attack.
But definitely NOT: </= 18...Nxe6??; 19.Qd7+,
Kf7;
20.Rf1+, ("+/-") {Diagram?}
and Fritz says that it is a mate in less than 10 moves. )
***
19.Rf1! Rd8; ('!?')
{Diagram?}
This could be forced
... or Black must play something like this.
( But definitely NOT: 19...Bxd1???; 20.Nxg7#!)
20.Nxg7+! Kf7; 21.Qh6! Rhf8!?;
22.Rxd8!? Qxd8; 23.Qxh7!,
23...Rh8; 24.Rxf3+ Bf6[];
25.Ne6+!! Kxe6; {Diagram?}
This is ugly ... Black tries to save
the Queen here ...
but loses a more important piece.
(!)
***
( Or Black could play: >/=
25...Rxh7!?; 26.Nxd8+ Ke8;
27.exf6, ("+/-") {Diagram?}
but thanks to the promotion
threats from the White f-pawn;
the first player is winning here
as well. )
***
26.Qf5+ Kf7; 27.Qg5! Nd7; 28.exf6 Rh7!?;
29.Ne4, "+/-"
{Diagram?}
Black is down FOUR Pawns
...
his King is sadly exposed ...
and he has no real play of
which to speak of.
(Just so you know where this line
came from, it was (hand) written down in a 'book' ...
{a pamphlet, really} called
"Spassky's 25 Best Games."
There was a
biographical section, about
30-40 pages long. Then the games, which were
VERY lightly annotated.
There were several blank pages in the back. I had
owned this 'book' since I
was about 13-14 years old. This variation was written in
the margin of that book. I checked this line today -
Sat. April 10th, 2004 - with
a strong chess program. There might be a few
slight improvements ...
but nothing
major. -
A.J.G.)
******************************************************************
Also bad for Black was the try:
</= 17...Nxe6?; 18.Nxe6
Rd8; {Diag?}
Something like this is forced for
Black in this position.
*******
( Of course not:
</= 18...fxe6?; 19.Qd7+
Kf7[]; {Diagram?}
This is definitely forced.
***
( If </= 19...Kf8??; then 20.Rf1+,
("+/-") {Diagram?}
and Black will not be able to
avoid a very speedy mate. )
***
20.Rf1+ Kg6;
{Box. / Diagram?}
Of course, this is forced.
( Not </= 20...Kg8???; 21.Qxe6#. )
21.Qxe6+ Bf6; 22.Rxf6+! gxf6;
23.Qxf6+ Kh5;
24.Rd4,
("+/-") {Diagram?}
and White will mate Black in
just two more moves from here. )
*******
{Returning to the main line of our
analysis here - that began ...
with
the errant move, 17...Nxe6?}
19.Nxg7+! Kf8; 20.Qh6 Rxd1+;
21.Rxd1 b4!?; {Diagram?}
Everything else loses here for
Black as well ... this is probably
the most interesting.
(...Bg5+!?)
22.Nd5!! Bxd5; 23.Ne6+! Ke8[];
{Diagram?}
This is 100% forced here.
( </= 23...Kg8??; ('???') 24.Qg7#. )
24.Rxd5! Qxd5;
{Diagram?}
What else can Black do here?
***
( Not </= 24...Qxa2?; 25.Nc7#.
Also losing for Black is:
</= 24...Qb6?!; 25.Ng7+ Kf8; 26.Qxb6, ("+/-")
{Diag?}
with an easy win for White. )
***
25.Nc7+ Kd7;
{Diagram?}
By now the second player must
realize that his goose is cooked.
26.Nxd5,
("+/-") {Diagram?}
and Black should feel quite free
to resign in this position. ]
******************************************************************************
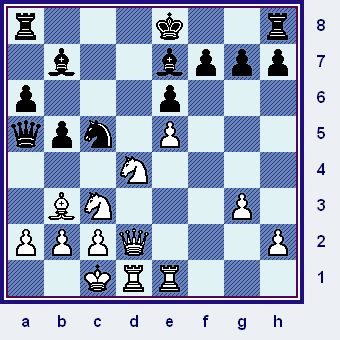
18.Bb3 Rad8;
19.Qf4 b4;
{See the diagram - just below.}
Black looks to be doing well.
I
remember once studying this game with a young player from Alabama - who
went
on to become a Master - and he thought Black was better in this
position.
(He did not even come close to guessing what White's next move
was!)
*************************
|
|
*************************
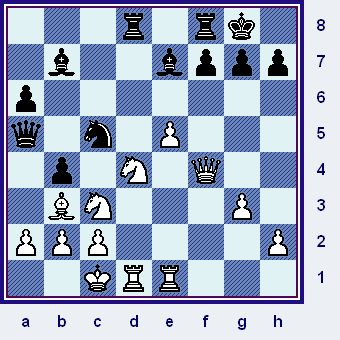
What square do you think that Spassky must retreat his threatened Knight to?
(b1, e2 ... or is the central square e4 the best in this position?)
20.Na4!!,
('!!!')
("A sock-dolager.")
{See
the diagram
... just below.}
Another truly shocking and
stunning move.
(My friends and
students are always floored when
I show them this incredible shot.)
*************************
|
|
(The position immediately following White's move, 20.Na4!!!)
*************************
I remember a funny story. I took a
book on Spassky to a chess tournament
back in the early
1970's. I was going
over this game, showing to a few
interested players. One of the strongest
and highest-rated players in the
tournament hall walked over. I showed
him this move and asked
him his real
opinion of it. He looked at the chess
board for a few minutes, then waved
his hand -
dismissing us completely. "You must have the board set up
wrong," he said ... "that couldn't
possibly be the move that Spassky
played there!" (Then he just walked away.)
[
Or
20.Nb1 Nxb3+; 21.axb3 Bd5; "=/+"
and maybe Black
is just slightly better. ]
20...h6!?;
(hmmm)
{See the diagram that follows [after]
the analysis.}
Is Black trying to be sneaky?
What is Polugaeyevsky's threat
from this position? (hint = g5)
I always felt that Black had to grab
the bull by the horns here, and
play ...NxN/a4.
(A true "Do or die," situation.)
I clearly remember myself and a few
friends spending a couple of Saturday
afternoons
when I was in High School;
pushing pieces around, yelling and
carrying on. And while
we never
really resolved the problem of this
particular position, we had a great
deal of
fun ... and learned a lot in the
whole process.
******************************************************************************
[
Andy Soltis
gives the following (somewhat superficial) analysis:
>/= 20...Nxa4; ('!')
21.Nf5!! Rxd1+!?;
{Diagram?}
This seems like a fairly natural
move for Black, and it also follows
general principles as well.
("When you are attacked, trade as many pieces as you can.")
( One book gives the line of: </= 21...Rfe8?!;
(but now) 22.Bxf7+!!,
22...Kxf7!?;
23.Rxd8! Rxd8; 24.Nd6+ Kg8; 25.Qf7+ Kh8;
26.Qxe7, ("+/-") {Diagram?} but White is clearly winning here.
{One simple win is if Black plays ...Bc8;
- to keep from dropping the
Bishop on b7 - White simply plays
QxR/d8+! and Nf7+.} )
22.Rxd1 Bc5!?;
('?!/?')
{Diagram?}
I guess Black is looking to activate
this somewhat passive piece.
*******
---> ( It seems much better to retreat
the Bishop to the d8-square.
>/= 22...Bd8!;
{Diagram?}
An odd-looking move, but a
play which is natural when you
realize that if Black allows Qg5,
he is simply lost.
23.Bxa4!?,
{Diagram?}
This is the <correct> move
according to A. Soltis ...
he even
praises this play for White. ('23.Bxa4!' - Andy Soltis.)
***
( Much better is the surprising
move - in this position, of:
>/= 23.e6!!, "+/=" "--->"
{Diagram?}
and according to IM S. Soloviov,
White will have a
great - and
possibly winning - attack. )
***
23...Qxa4?!;
(Really - '?')
{Diagram?}
I guess this is the main idea -
but Soltis does not discuss any
alternatives here for Black.
(Black blindly falls in with White's
plan. But the second player has
a better move that I wrote into
the
U.S. Chess magazine about ... but never got a reply.)
***
( MUCH better was the move:
>/= 23...h6!; "~" (in-between) {Diagram?}
and two week's worth of analysis
never revealed any forced
wins
here for White. ('23...h6!!' - IM Sergei Soloviov.)
)
***
24.Rxd8 Rxd8; 25.Qg5,
"+/-" {Diagram?}
and thanks to the mate threat
on g7, Black will pick off a whole
Rook here. )
<---
*******
23.Qg5 g6; 24.Nh6+! Kg7;
25.Ng4!, ("+/-")
{Diagram?}
and White has a mating attack,
despite Black's (useless) extra
piece
in this position.
(If 25...Qb6!?; then White simply
plays the thunderbolt,
26.Rd6!!,
winning the house.) ]
******************************************************************************
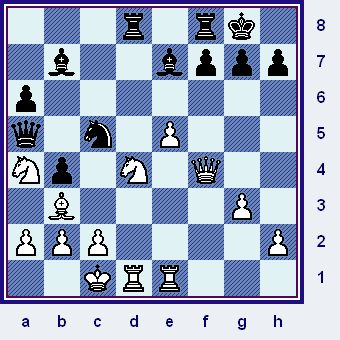
*************************
|
|
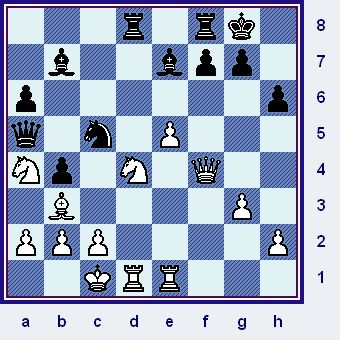
The position just before White executes his 21st move here.
*************************
21.Nxc5!!,
(White allows ...Bg5?)
A tremendous shock and surprise to
Polugaeyevsky's poor nervous system.
(Now if Black tries to win White's
lady, Spassky will net a ton of extra
material.)
[ Black probably expected:
21.h4!? {Diagram?}
(To prevent
his Queen from being pinned.) ]
21...Qxc5;
{Box?}
This was probably forced here.
[
Not recommended was:
</=
21...Bg5?!; ('?')
22.Qxg5! hxg5;
23.Nxb7 Qc7; 24.Nxd8 Rxd8;
25.e6!, '±±' (Maybe "+/-")
{Diag?}
when Spassky has gained 2 minor
pieces ... AND a Rook! ... for the Q.
(All the computers that I tested this
position on, considered White to be
just clearly winning here.)
]
Now the move h4 works ... and also
gives Spassky a fairly large edge here.
22.h4,
('!')
22...Bd5; 23.Nf5! Bxb3; 24.axb3 Rxd1+; 25.Rxd1 Rc8;
26.Qe4!, (nice)
"The way Spassky combines attack
and defense is captivating as well
as instructive."
- Andrew Soltis. (Quite right, Andy!)
[ Another idea here was:
26.Nxe7+!?,
{Diagram?}
heading immediately for the
end-game where White
is a
whole pawn up. ]
26...Bf8;
{Box?}
Black does not want a {later} hanging Bishop on this square.
[ Not
</= 26...Qc6??;
when 27.Nxe7+,
{Diagram?}
forks all of Black's pieces left
on the board. ]
27.e6! fxe6;
28.Qxe6+ Kh8; 29.Qe4 Qc6; 30.Qd3!,
{See
the diagram below.}
As Soltis is quick to point out, White
is not quite ready to go for the ending,
there are a few issues, (weaknesses);
to be resolved first.
*************************
|
|
(The position immediately following 30.Qd3, by White.)
*************************
[ Also good for White was:
30.Qxc6 Rxc6; 31.g4,
"+/=" ('±') {Diagram?}
but Spassky's method is superior.
]
30...Re8;
31.h5! Be7;
This is pretty much forced for Black
in this position ... if Polugaeyevsky
allows Nh4-to-g6+,
it will probably
result in a complete disaster!
[ Not 31...a5?; 32.Nh4!, '±' ]
Many of the masters and other good
players in the tournament hall were
predicting that
the game would now
end in a draw. (Spassky's position
is NOT all that impressive at
the
moment here. And White's extra
Pawn on the Queen-side is also
doubled and kind
of clumsy.)
32.Nxe7 Rxe7;
33.Qg6! Qe8; 34.g4! Re1;
{Box?}
Black cannot exchange Queens on
the g6-square ... the resulting
position is completely
lost for him.
(The pawn on g6 would greatly
ham-string Black, if his Rook ever
left the
back row; Black would be
check-mated!)
[ Much, much worse for Black was
the following continuation:
</= 34...Qxg6?; 35.hxg6 Re8;
{Diagram?}
This is close to
being forced for Black.
( </= 35...Re6??; 36.Rd8+ Re8; 37.Rxe8#. )
36.Rd6 Ra8; 37.Rb6 a5;
38.Kd2, ("+/-")
{Diagram?}
The win is pretty simple for White,
the first player plays c4, and then
marches his King over. Black can't
offer any meaningful resistance from
this position. {technique}
]
**********************************************************
**********************************************************
Now a few well placed blows and
very finely executed plays by White
from this
position brings Black's
struggles to an end.
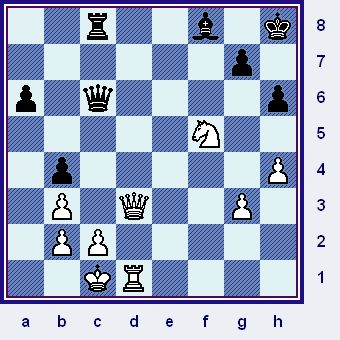
35.Qxe8+ Rxe8; 36.Rd4 a5; 37.Kd2 Re5; 38.c3! bxc3+;
39.bxc3 Rg5;
40.c4! Kg8; 41.Rf4!, ("+/-")
{See the
diagram
below.}
(Black Resigns.) Spassky has alertly fixed all of
Polugaeyevsky's King-side Pawns
prior to entering the R+P endgame.
His last move cut the board in half
and prevents
Black's King from
crossing the board. White's King
comes to c3, then he plays b3-b4.
After this, White's passed QBP,
strongly supported by the WK will
easily decide the
game in Spassky's
favor here.
*************************
|
|

(The final position of this fantastic game.)
*************************
One of Spassky's most brilliant and
powerful wins. I don't think any player
who ever lived ...
- not Tal, Fischer, nor
even Kasparov - can show a game
with a greater number of beautiful
and
truly surprising chess moves. A great
game, a classic Spassky showpiece,
and a contest
that should be cherished
by chess-players everywhere ... for as long as the game is played.
******************************************************************************
******************************************************************************
******************************************************************************
BIBLIOGRAPHY:
I have many different books that have
this game in it. I also have several
game collections of
this player's best
games, like the one by Cafferty.
But my two main sources for material
to aid me in my attempt to annotate
this game, NOT
counting dozens of
books on this opening, were:
# 1.) "The Best Chess
Games of
Boris Spassky," (1949-1971) by IM Andrew
Soltis.
(This book was written and released
well before Andy ever got the GM title.)
Copyright (©) by the author. (And the publisher, of course.)
Printed in 1973 by David McKay books
of New York City. (USA)
# 2.) GM "Boris SPASSKY's ...
Four Hundred (400) Selected Games,"
by IM Sergei Soloviov. (This book
is part of the "Chess Stars" series
of books,
out of Moscow, Russia.) Copyright (c) by the author, 2003.
Printed in Sofia, BUL. ISBN: # 954-8782-29-4
*******
I have looked at this game in the following book, (which was not
available when I first annotated this game):
"My Great Predecessors, Part III,"
by GM Garry Kasparov and also NM Dimitry
Plisetsky.
(Chapter Two, Game # 49, Page 187.) I do not care for his
annotations, he scars this great game of chess
with his overly excessive criticisms. I can never tell if he is
being honest, objective, or just egotistical.
*************************
All my games ... the program that was initially used to generate the HTML code was: ChessBase 8.0.
Copyright (c) LM A.J. Goldsby I.
Copyright (©) A.J. Goldsby, 2004.
(All rights reserved.)